Hub Configuration Wizard
When the Hobson Hub is installed, it will be in a default and unconfigured state. You should run through the web-based wizard to perform configuration tasks.
Accessing
The installer should automatically take you to the configuration wizard on Windows or Mac OS X if you chose to run the Hobson Hub after installation. If not, or if you are on Linux, the wizard can be accessed at the following address:
http://localhost:8182/setup/index.html (HTTP) or https://localhost:8183/setup/index.html (HTTPS)
NOTE: localhost should be substituted for your Hub's address if your browser is not running on the Hub machine itself.
Configuration
The wizard will run you through a series of steps to perform initial configuration the Hub.
Step 1 - Hub Name and address
| Name | Description |
|---|---|
| Hub Name | This is the name that the Hub will use to advertise itself on your local network. If you are using the cloud service, this is the name that will be used to uniquely identify this particular Hub. |
| Address | The physical address the Hub is located at. This will later assist in determining your latitude and longitude in order to calculate sunrise and sunset. This information is stored locally and not sent anywhere. |
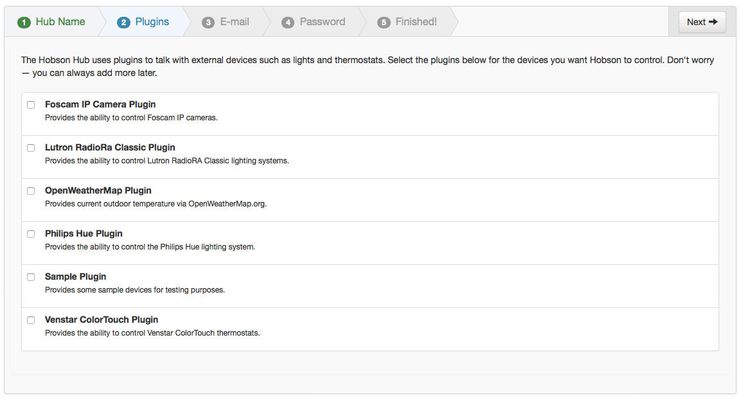
Step 2 - Plugins
This will be a list of currently available Hobson plugins. You should select ones that correspond to the smart devices that you wish Hobson to control and monitor. Select one or more plugins and then click the "Next" button to proceed. The plugins will be automatically downloaded in the background.
Step 3 - E-mail
Hobson can be configured to send an e-mail when events that you identify occur (for example, when a smoke detector goes off). If you want to leverage this ability, fill out your e-mail server information. Once that is done (or if you don't want to use the e-mail feature) click the "Next" button to proceed.
Step 4 - Password
In order to access the Hobson web console, a user name and password are required. The user name will always be admin. The password will be the one that you enter on this wizard screen. Enter the desired password twice and then click the "Next" button to proceed.
Developer Note: This password is the same one used to access the Hobson Hub's REST API.
Step 5 - Finished
The Hub configuration is now complete. Click the "Complete" button to be taken to the Hobson web console!


